

Due to popular demand (?) at my lab in ETH Zürich, I will describe the tips & tricks for when I set up programming environements on my computer. Feel free to steal the ones you find useful. Suggestions and ideas are always welcome!
- 12.02.2025: added the WSL and Python venv section
- 28.04.2023: updated with better sectioning, update descriptions, and add the
screencommand. - 29.10.2021: updated with new entries like GitHub Copilot (this is a potential game-changer for coders) and Ubuntu-specific UI customizations.
Use zsh shell
The command shell is what runs on your terminal to let you interact with the computer. For example, ls, cd, etc are all bash commands.
By the end of this section, you will have
- a cool theme on your shell
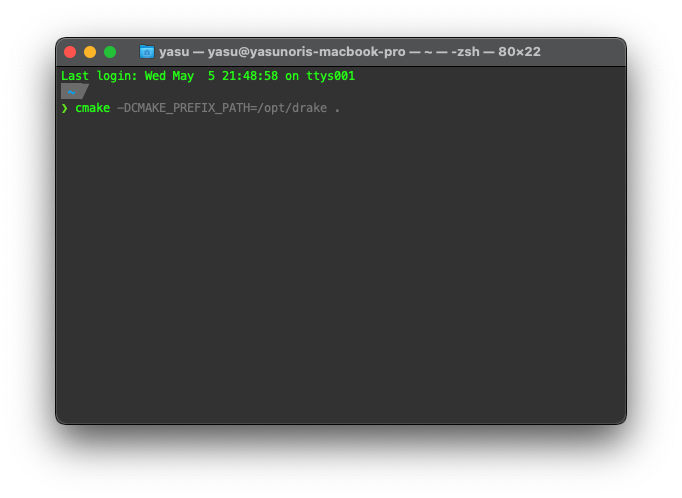
- autocomplete entire commands (the screenshot above shows what happens when I just type
cmake- it suggests commands I typed in the past that match the current input)
Zsh is an extended version of the bash shell. Change from bash to zsh (for macOS zsh is already the default shell), for Ubuntu…
# install zsh
sudo apt install zsh
# set as default shell
chsh -s $(which zsh)
Next, install Oh My Zsh, which among other things lets you use plugins and themes on the zsh shell. Installation can be done by
sh -c "$(curl -fsSL https://raw.githubusercontent.com/ohmyzsh/ohmyzsh/master/tools/install.sh)"autosuggest from past commands with zsh-autosuggestions
After installing ohmyzsh, install zsh-autosuggestions for the autocomplete feature.
git clone https://github.com/zsh-users/zsh-autosuggestions ${ZSH_CUSTOM:-~/.oh-my-zsh/custom}/plugins/zsh-autosuggestionsEdit ~/.zshrc and add zsh-autosuggestions to the corresponding line for plugins. For example, if the git plugin is already enabled as is the default case, it would look like
plugins=(git zsh-autosuggestions)And now you have autocomplete features in the terminal! When suggestions start showing up, press the arrow keys ↑ / ↓ to cycle through past commands that match the current input, → to choose the command currently being shown transparently, or alt + f to autocomplete word by word.
Use Windows Subsystem on Linux (WSL)
These days (note: this section was added 02.2025) I don’t use native Ubuntu that much anymore- I’ve found that I can get most “Linux” stuff done just with WSL (even connect to USB devices! But only if you set it up carefully), even programs that use the GUI like tkinter or matplotlib. Go through the official tutorial to install it.
- check that the GUI works properly with an app like
xeyes(install withsudo apt install x11-apps) - run
code ., to launch VSCode from that directory - run
explorer.exe .to launch the Windows Explorer for that directory - to show pyplot figures, you might have to
sudo apt install python3-tk
Also, a useful lifehack I’ve found is that if you ssh -X to another computer from within WSL, you can get X11 forwarding without any extra settings! You can even show IsaacGym windows in Windows.
use Python mujoco library in WSL
This is specific to my use case, but if you want to run mujoco in python, you can pip install mujoco. But you might also have to:
sudo apt install libgl1-mesa-dev xorg-dev libgomp1 mesa-utils libgl1-mesa-dri- (maybe some of them are not actually needed…)
- run
export LIBGL_ALWAYS_SOFTWARE=1for every new terminal, if you want to show the GUI- you could add this to
~/.zshrcif you want, I guess
- you could add this to
Then you can launch the MuJoCo GUI with python -m mujoco.viewer --mjcf your_robot_model.xml, and of course run your Python programs that import mujoco as well.
use Python virtual environments
You should keep your base Python environment completely clean (don’t even install numpy on it), and you should definitely use virtual environments for each project. While there are other virtual environment solutions like conda or anaconda or miniconda or whatever, the one that comes with Python should be enough for most cases:
- in your project folder, run
python3 -m venv venv- this creates a folder called
venvin the current directory with the virtual env - change the last argument if you want to name the folder something else
- add
venv/to .gitignore so that the folder not git tracked
- this creates a folder called
- go into the virtual environment with
source venv/bin/activate
That’s it! Then you can install stuff into it without contaminating the base environment at all.
general terminal tips
reverse-i-search
This works like a simpler version of the zsh-autosuggestions plugin, but it is available by default in both bash and zsh, and also many other text input interfaces like the Python interpreter.
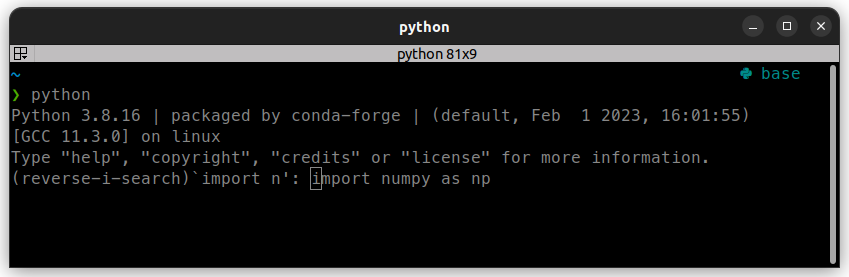
Just press ctrl-r, and start typing to start searching your past commands. If you press ctrl-r again it will keep cycling through old commands that match the string that is being currently typed. When the command that you want shows up, just press enter to execute that line. For example, the screenshot below shows what happens in the Python interpreter when I do ctrl-r to go into reverse-i-search mode and start typing import n - it already suggest the line import numpy as np.
move cursor one word at a time
This is the same for bash and zsh, and probably any other terminal emulator. use alt-f to go forward, and alt-b to go back one word at a time. alt-d to delete the word in front of the cursor. This is also the emacs keybind for the same movements.
show multiple panes in a single terminal window with Terminator
# Ubuntu
sudo apt install terminator
# macOS
brew install terminator
and use it as your terminal emulator (it is installed as an app, so just launch it like any other app). Use ctrl-shift-o and ctrl-shift-e to split panes, and alt - [arrow key] to move between panes.
keep running programs even after exiting the terminal with screen
For example if you want to run a long computation on a remote server. Use the screen command to enter a new screen, start running your program, and then ctrl-a + d to detach from the screen. You can then exit the terminal, and the program will keep running in the background. When you want to check on the program, just ssh back into the server and use screen -r to reattach to the screen.
VSCode tips
use GitHub Copilot
This gives you AI-powered suggestions while you code, which you can choose to use by pressing tab. I really cannot stress how much more efficient this makes you at writing code, especially for writing menial code that are similar across different projects (e.g. initial setup of OpenCV windows). It works for many programming languages, even plain text; you can even try to have a simple conversation with it. Sometimes it’s creepy how accurately it can guess my intensions when I code. However, there are just as many instances where it suggests completely off-the-mark code. Use with a healthy dose of caution.
It’s still in technical preview, so you’ll have to enroll in it on their website.
when doing CMake projects
If you are opening a project with a CMakeLists.txt file in the top directory, you can set up VSCode to compile your programs from GUI.
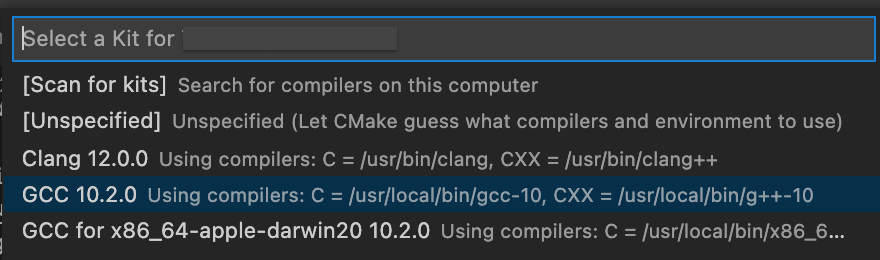
Install the cmake extension, ctrl-shift_p (the shortcut for VSCode commands) and select “CMake: Configure”. Then select compiler, probably gcc **.**.**.
Select the CMake icon in the sidebar, and it should have a list of all the executables and libraries in the project. Right-click and you can “build”, “run”, “debug”, etc.

sync your settings
Press ctrl-shift-p to enter the VSCode command terminal, and enable settings sync. It’s so much easier to use multiple computers when you can use your editor configured exactly the same way on all your devices.
Vim
Use the Vim extension for VSCode. It will let you do a lot of things, like moving the cursor or switching between files, without ever having to touch the mouse. If you will code anything over 100 lines, I recommend picking up these commands, as once you master them it will definitely let you code much faster and efficiently.
However there is somewhat of a steep learning curve to be able to use Vim, so you could run the vimtutor command for a tutorial, or try out this pretty cool RPG-style vim tutorial online.
Or use Emacs, that’s totally cool as well.
use jj to enter insert mode
I recommend setting it up so you can switch to insert mode with jj instead of the ESC key which can be hard to press.
- For VSCode Vim
- add this to settings.json
  "vim.insertModeKeyBindings": [
  {
  "before": ["j", "j"]
  "after": ["<Esc>"]
  }
  ],
- add this to settings.json
- for Vim
- add this to .vimrc
inoremap <silent> jj <ESC>
- add this to .vimrc
bonus stuff
set a cool wallpaper every day
The GNOME Extension Bing Wallpaper will refresh your Ubuntu desktop with Bing’s picture of the day, it’s pretty nice
get the macOS wallpapers
This site has basically every single macOS wallpaper that there has ever been.
 How to model tendon-driven robots: Calculating kinematics and forces through the tendon Jacobian
 Cut off the Internet, and LLMs are still a hallucinating mess.
 How to Set Up Isaac Sim on Non-Officially Supported AWS Instances with Remote Desktop Access
 About that time we won the mimic / Loki / OpenAI Robotics Hackathon