

I needed to set up Isaac Sim on an AWS instance type not officially supported by the NVIDIA’s official Amazon Machine Image (AMI) NVIDIA Isaac Sim Development Workstation (Linux) for the Real World Robotics class- this is my (cleaned up) memo on how to do it.
Why would you want to do this? For us it was because the instance types supported by the official image were:
- expensive
- The cheapest type supported by the Isaac Sim AMI in our region was
g5.4xlargeat $2.0308/hour g4dn.2xlargecan also run Isaac Sim spec-wise, at only $0.94/hour
- The cheapest type supported by the Isaac Sim AMI in our region was
- scarce
- We found that often we couldn’t start instances on
g5.4xlargedue to the InsufficientInstanceCapacity error, meaning there aren’t enough machines in the region that can be allocated for our instance.
- The only solution for this to wait until some capacity frees up, change the region (you can use the Spot placement score as a proxy to roughtly see which region is best suited for your instance type), or change the instance type. The machine types for the Isaac Sim AMI tend to be newer and more scarce / more in demand and we often had this problem. This would be a problem when students want to start up their instances.
- We found that often we couldn’t start instances on
The tricky part I had to figure out was setting up the remote desktop with Amazon DCV- installing Isaac Sim (& Isaac Lab) was pretty straightforward, as I started out from the NVIDIA GPU-optimzied AMI which has the NVIDIA drivers already installed.
After going through this, you should be able to:
- run Isaac Sim / Lab on any AWS instance type that supports it (even if it’s not supported by the official Isaac Sim AMI)
- connect to it with remote desktop so you have the full Ubuntu GUI.
disclaimer: I’m just sharing what worked for me — use this at your own risk! Any AWS costs, instance hiccups, data loss, or other issues that come up from following this guide are completely your responsibility. Double-check your settings and pricing before spinning up anything.
choose the instance type
The website https://instances.vantage.sh/ has a useful table of all available AWS instance types- you can filter by the specs in the Isaac Sim requirements to choose your instance type.
For me, g4dn.2xlarge showed up as the cheapest (at $0.94/hour in eu-central-1) instance type which fulfills the minimum Isaac Sim requirements.
create Security Group
Before creating the instance, we create the security group so it can be chosen during the instance launch (of course you can do this later as well, it’s just “cleaner” for the tutorial if we do this first).
The purpose is to set up which ports will allow inbound connections to your instance. In the “Security Groups” menu in EC2, create a new security group (name suggestion: IsaacSimConfiguration) with the inbound rules
| Type | Protocol | Port range | Source | Description |
|---|---|---|---|---|
| SSH | TCP | 22 | Anywhere-IPv4 | for SSH connections |
| Custom TCP | TCP | 8443 | Anywhere-IPv4 | remote desktop with Amazon DCV |
| Custom TCP | TCP | 49100 | Anywhere-IPv4 | WebRTC streaming for Isaac Sim |
| Custom UDP | UDP | 47998 | Anywhere-IPv4 | WebRTC streaming for Isaac Sim |
create the instance
- click on Launch instances in the EC2 Instances menu
- set some easily distinguishable name
- for Application and OS Images (Amazon Machine Image), search for NVIDIA GPU-optimized AMI
- select the instance type that you chose earlier (e.g.
g4dn.2xlarge) - set your SSH key pair so you can remote access your instance
- for Firewall (security groups), select the
IsaacSimConfigurationthat you made earlier - for the storage I chose 128GB (minimum selectable for this instance type) of gp3 (AWS default storage type) storage.
- here, if you want faster i/o speeds you can set a faster throughput (choose the Advanced menu)
- note that anything above the default 125 MB/s will cost you (usually $0.04 / MBps / month)
- e.g. for 400 MBps you pay $11 / month.
- launch!
Now you should be able to connect to it with ssh -i C:\Users\path\to\key.pem ubuntu@***.***.***.***
send capacity increase request for your account
if your account doesn’t have enough vCPU quota and you can’t launch your EC2 instance, request an increase in the Running On-Demand G and VT instances in the Service quotas page. I think it’s easier to get requests approved if you also send a small message explaining why you need this increase.
https://eu-central-1.console.aws.amazon.com/servicequotas/home/services/ec2/quotas (select your region)
set automatic shutdown of instance on low activity
optional but strongly recommended
After you launch the instance, you can set an alarm so that the instance turns off automatically after 1 hour of low activity (< 2% CPU usage)- important to avoid being overcharged when you’re not using the instance at all.
Create alarm as follows (I referred to this article for this), so that it detects that CPU usage has been less than 2 % for 4 consecutive samples, which are sampled every 15 minutes, i.e. instance has low usage for more than 1 hour (if Period is set to 1 hour and Consecutive periods is set to 1, as in the original article it may turn off right after the instance has booted, so use this multi-sample configuration instead)
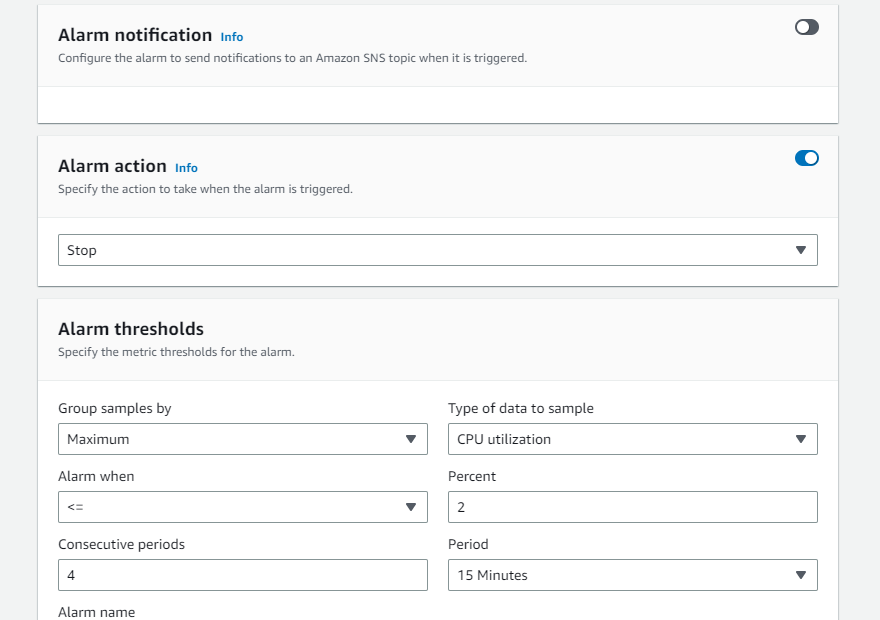
Use the default name for the “Alarm name”- which ensures it won’t clash with other existing alarms
install Amazon DCV Server
We will mostly follow the official AWS guide for Installing the Amazon DCV Server on Linux with a few changes that I noticed was needed.
install prerequisites
Official tutorial: https://docs.aws.amazon.com/dcv/latest/adminguide/setting-up-installing-linux-prereq.html
Run the commands for Ubuntu 20.x, 22.x, and 24.x in the official page. You can skip Verify OpenGL software rendering as we’re on a GPU Linux server
Make sure you also run the step Install GPU drivers for graphics instances- the NVIDIA driver is already installed but you need to generate an updated xorg.conf with the nvidia-xconfig command.
only after this the ps aux | grep X | grep -v grep check worked for the X Server running check.
install the Server
Official tutorial: https://docs.aws.amazon.com/dcv/latest/adminguide/setting-up-installing-linux-server.html
Again, run the commands for Ubuntu 20.x, 22.x, and 24.x in the official page. I recommend you also install the options:
- web client
nice-xdcvpackage (for virtual sessions)nice-dcv-glpackage (thedcvgladminanddcvgldiagcommands installed through here will be useful in the next part)
post-installation checks
Official tutorial: https://docs.aws.amazon.com/dcv/latest/adminguide/setting-up-installing-linux-checks.html
I needed to sudo reboot before the checks worked. I skipped the Verify the Amazon DCV DEB package signature step.
set up access to S3 for the license server
Official tutorial: https://docs.aws.amazon.com/dcv/latest/adminguide/setting-up-license.html
The page guides you to create a JSON-based IAM role for the Amazon S3 access policy. Unfortunately this is quite unintuitive- in the AWS console, choose “Modify IAM role” and “Create new IAM role”. Here, you first have to make an empty role in order to define a role with JSON (which I found out thanks to this aws forum post).
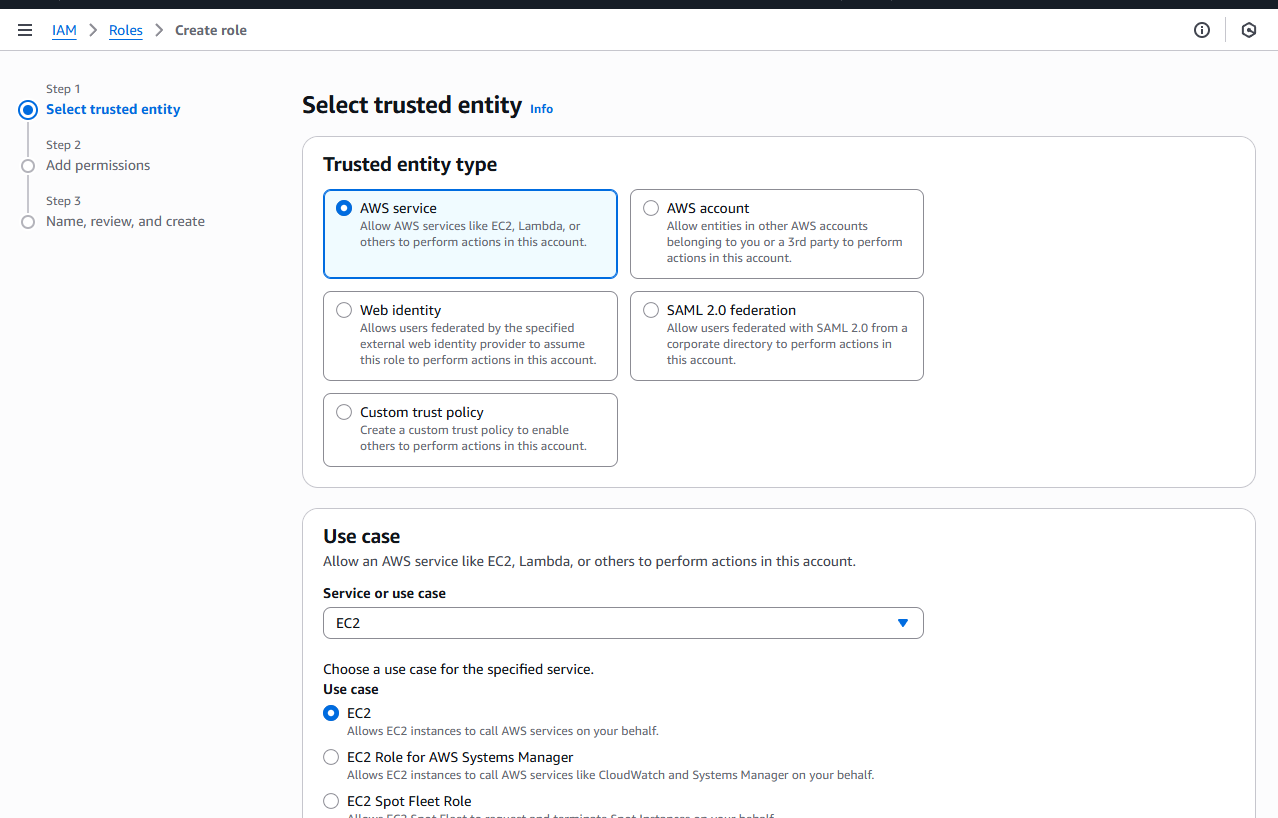
- Trusted entity type: AWS service
- Use case: EC2 (because we want to allow EC2 instances to access S3 buckets)
Skip the next page, and in the proceeding page set a role name (suggested: DCV-EC2-LicenseAccess)
Then select the DCV-EC2-LicenseAccess role again from the list of all IAM roles, and in there go to “Add permissions” -> “Create inline policy”
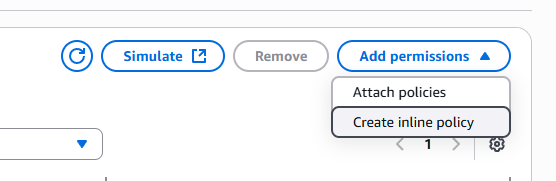
choose JSON and copy & paste the JSON (replace region with your instance’s region, e.g. eu-central-1)
{
    "Version":"2012-10-17",
    "Statement": [
       {
           "Effect": "Allow",
           "Action": "s3:GetObject",
           "Resource": "arn:aws:s3:::dcv-license.region/*"
       }
    ]
}
set the DCV server to automatically start
Official tutorial: https://docs.aws.amazon.com/dcv/latest/adminguide/manage-start.html
# to start the DCV server
sudo systemctl start dcvserver
# configure the Amazon DCV server to start automatically on Linux
sudo systemctl enable dcvserver
set the DCV session to automatically start
Unfortunately all this is still not enough, but we are almost there - we need to set it up to start a DCV session automatically (or it needs to be started with dcv create-session session_ID)
https://docs.aws.amazon.com/dcv/latest/adminguide/managing-sessions-start.html
open /etc/dcv/dcv.conf in a text editor and edit its entries:
[session-management]
create-session = true

[session-management/automatic-console-session]
owner="ubuntu"
and relaunch DCV Server.
set password on instance
A password must be set for the ubuntu user before connecting with the DCV.
sudo passwd ubuntu
Connect to DCV Server
To connect through the browser, just go to https://***.***.***.***:8443 (HTTPS is required), ignore the warning, and login.
Or download the DCV client for your environment and connect to ***.***.***.***:8443. You should be able to connect!
If you have any issues about not being able to connect, try the post-installation checks again and make sure all are working.
install Isaac Sim & Lab
The official instructions for Installation using Isaac Sim Pip Package worked perfectly for me, thanks to the preinstalled NVIDIA drivers. Make sure you’re in the remote desktop when you run isaacsim so that the GUI can launch.
Finally: how much does this all cost per month?
Assuming it runs 24×7 (≈730 hours/month)…
g4dn.2xlargeon-demand pricing in eu-central-1: $0.94/hour x 730 hours = $686.2- 128 GB gp3 EBS volume: $0.095/GB-mo × 128 GB = $12.16
- enhanced throughput 400 MiB/s (above 125 is charged): (400 – 125) MiB/s × $0.048/MiB/s-mo = $13.20
- optionally, if you set a static public IPv4 with Elastic IP: $0.005/hr = $3.65
i.e. In total, around $715 per month. Note: data-transfer also gets charged but not included.
 How to model tendon-driven robots: Calculating kinematics and forces through the tendon Jacobian
 Cut off the Internet, and LLMs are still a hallucinating mess.
 About that time we won the mimic / Loki / OpenAI Robotics Hackathon